Pages

Sunday, May 18, 2014

Adding new attribute to Grouper psp provisioning

Use Case:

I want to update the ldap attribute name affiliations using grouper psp provisioning.

The following tasks needs to performed to add a new attribute to Grouper psp provisioning. They are

1. Create Attribute Definition

Create the new attribute definition as a etc:attribute:affiliations

 1.1 Open the Grouper Command Prompt.

   Go to the apiBinary-2.1.5/bin directory and execute the gsh.sh file.

  1.2 Restart the Grouper Session

grouperSession = GrouperSession.startRootSession();

1.3 Search the Grouper Folder

folder = StemFinder.findByName(grouperSession, "etc:attribute",true)

1.4 Create the Grouper Attribute Definition

attributeDef = folder.addChildAttributeDef("affiliations", AttributeDefType.attr);
// assigning to member object
attributeDef.setAssignToMember(true);
// this attribute is a multivalued attribute
attributeDef.setMultiValued(true);
// setting the data type
attributeDef.setValueType(AttributeDefValueType.string);
//Assign to multiple objects
attributeDef.setMultiAssignable(true);
attributeDef.store();

In the above example attribute definition name is affiliations. If you want to use different attribute definition name replace affiliations with your own attribute definition name.


2. Adding Attribute Name

attrName = folder.addChildAttributeDefName(attributeDef,"affiliations","affiliations");

In the above example attribute name is affiliations. If you want to use different attribute name replace affiliations with your own attribute name.

3. Adding psp affiliation attribute in psp.xml file

Go to the apiBinary-2.1.5/conf directory and edit the psp.xml file and add the following. 

<!-- Provision a member's affiliation triggered by the grouper change log. -->

  <pso id="affiliation">

    <!-- The ldap member DN calculated from the member  change log events. -->
    <identifier
      ref="changeLogAffiliationMemberDn"
      targetId="ldap"
      containerId="${edu.internet2.middleware.psp.peopleBaseDn}" />

    <!-- The ldap member "objectClass" attribute. No existing values will be deleted since retainAll is true. -->
    <attribute
      name="objectClass"
      ref="memberObjectclass"
      retainAll="true" />

    <!-- The ldap attribute "affiliations" to provision the person object . -->
    <attribute
      name="affiliations"
            ref="affiliationchangeLogMember" />
  </pso>

I have used ref attributes in the above psp.xml file. These references are available in the psp-resolver.xml file. Please follow the section 4. Defining Data Connectors and 5. Defining attribute Definitions.

4. Defining the Data Connectors 

Go to the apiBinary-2.1.5/conf directory and edit the psp-resolver.xml file and add the following data connectors and these connectors are retrieve data from the grouper_change_log_entry table. I have used the variables like category,attributeAssignType and action  in the filters sction. These variables are available in the grouper_change_log_type table and according to your assignment object(member or group or membership etc), you can change.  They are

4.1 Retrieving the affiliations Data from the Change Log


<!-- Defining the DataConnector to retrieve the change log entry based on the category=attributeAssignValue and attributeAssignType="member" -->

<resolver:DataConnector
    id="MemberAttributeAssignValueChangeLogDataConnector"
    xsi:type="psp-grouper-changelog:ChangeLogDataConnector">
    <!-- The AND filter matches both child filters. -->
    <grouper:Filter xsi:type="grouper:AND">
      <!-- The ChangeLogEntry filter matches change log entries with the given category. -->
      <grouper:Filter
        xsi:type="psp-grouper-changelog:ChangeLogEntry"
        category="attributeAssignValue" />
      <!-- The ChangeLogAttributeAssignType filter matches change log entries with the given attribute assign type. -->
      <grouper:Filter
        xsi:type="psp-grouper-changelog:ChangeLogAttributeAssignType"
        attributeAssignType="member" />
    </grouper:Filter>
</resolver:DataConnector>

4.2 Retrieving the affiliations Data Add Operation to build the Ldap DN

 <!-- Retrieving the Add attribute value from the change log entry-->
 <resolver:DataConnector
    id="AddAffiliationChangeLogDataConnector"
    xsi:type="psp-grouper-changelog:ChangeLogDataConnector">
    <!-- The ChangeLogEntry filter matches change log entries with the given category and action. -->
    <grouper:Filter
      xsi:type="psp-grouper-changelog:ChangeLogEntry"
      category="attributeAssignValue"
      action="addAttributeAssignValue" />
  </resolver:DataConnector>

4.2 Retrieving the affiliations Data Delete Operation to build the Ldap DN

<!-- Retrieving the Deleted Value from the Change Log Entry  -->
<resolver:DataConnector
    id="DeleteAffiliationChangeLogDataConnector"
    xsi:type="psp-grouper-changelog:ChangeLogDataConnector">
    <!-- The ChangeLogEntry filter matches change log entries with the given category and action. -->
    <grouper:Filter
      xsi:type="psp-grouper-changelog:ChangeLogEntry"
      category="attributeAssignValue"
      action="deleteAttributeAssignValue" />
  </resolver:DataConnector>

5. Defining Attribute Definitions

Go to the apiBinary-2.1.5/conf directory and edit the psp-resolver.xml file and add the following attribute definitions to retrieve data from the data connectors and alto calculate the distinguished name (dn). They are

5.1  affiliationchangeLogMember attribute definition


<!-- Defining the  affiliationTemp attribute to retrive the etc:attribute:affiliations attribute -->
<resolver:AttributeDefinition id="affiliationTemp" sourceAttributeID="etc:attribute:affiliations" xsi:type="ad:Simple">
        <resolver:Dependency ref="MemberDataConnector"/>
<resolver:Dependency ref="MemberAttributeAssignValueChangeLogDataConnector"/>
</resolver:AttributeDefinition>

<!-- Populating the affiliation attribute to affiliationchangeLogMember  -->

<resolver:AttributeDefinition id="affiliationchangeLogMember" xsi:type="ad:Script" sourceAttributeID="affiliationTemp">
<resolver:Dependency ref="MemberDataConnector"/>
<resolver:Dependency ref="affiliationTemp"/>
<resolver:Dependency ref="MemberAttributeAssignValueChangeLogDataConnector"/>
<ad:Script>
<![CDATA[

importPackage(Packages.edu.internet2.middleware.shibboleth.common.attribute.provider);
importPackage(Packages.java.lang);
affiliationchangeLogMember = new BasicAttribute("affiliationchangeLogMember");

if(affiliationTemp != null && affiliationTemp.getValues().size()==1)
{
value= affiliationTemp.getValues().get(0);
System.out.println("nvoking the Affiliation Package  "+value);
if(value != null)
{
affiliationchangeLogMember.getValues().add(value);
}
}
]]>
</ad:Script>
</resolver:AttributeDefinition>

<!-- Getting the etc:attribute:affiliation attribute data value End -->

5.2 changeLogAffiliationMemberDn attribute definition


<!-- Building the Ldap DN Based on the member and Subject ID Start -->

 <resolver:AttributeDefinition
    id="changeLogAffiliationMemberDn"
    xsi:type="psp:PSOIdentifier"
    sourceAttributeID="changeLogAffiliationMembershipLdapSubjectDn">
    <resolver:Dependency ref="changeLogAffiliationMembershipLdapSubjectDn" />
  </resolver:AttributeDefinition>

  <!-- The value of the "changeLogMembershipLdapSubjectDn" attribute is the value of the memberSubjectId in the grouper change log entry-->
  <resolver:AttributeDefinition
    id="changeLogAffiliationMembershipLdapSubjectDn"
    xsi:type="ad:Script">
    <resolver:Dependency ref="AddAffiliationChangeLogDataConnector" />
    <resolver:Dependency ref="DeleteAffiliationChangeLogDataConnector" />
    <ad:Script><![CDATA[

        importPackage(Packages.edu.internet2.middleware.shibboleth.common.attribute.provider);
importPackage(Packages.java.lang);
importPackage(Packages.edu.internet2.middleware.grouper);
        // Defining the attribute definition
        changeLogAffiliationMembershipLdapSubjectDn = new BasicAttribute("changeLogAffiliationMembershipLdapSubjectDn");
        // checking the memberSubjectId and attributeAssignType are available in the chnagelog entry 
        if (typeof memberSubjectId != "undefined" && memberSubjectId != null ){
if(typeof attributeAssignType != "undefined" && attributeAssignType != null )
{
if(attributeAssignType.getValues().size() > 0)
{
 // checking the attributeAssignType is member then get the ldap dn from the ldap source.
if(attributeAssignType.getValues().contains("member"))
{
System.out.println("changeLogAffiliationMembershipLdapSubjectDn     " + memberSubjectId.getValues() );
data=SubjectFinder.findByIdAndSource(memberSubjectId.getValues().get(0),"ldap",false);
if(data != null && data.getAttributes().isEmpty()==false)
{
if(data.getAttributes().containsKey("dn"))
{
ldapuserdn = data.getAttributes().get("dn").iterator().next();
System.out.println("Getting the Data from the Ldap Source "+ldapuserdn);
changeLogAffiliationMembershipLdapSubjectDn.getValues().add(ldapuserdn);
}
}
else
{
System.out.println("No Object Found "+memberSubjectId.getValues().get(0));
}
}
}
}
        }
        else
        {
System.out.println("changeLogAffiliationMembershipLdapSubjectDn    subjectdn  "+changeLogAffiliationMembershipLdapSubjectDn );
}

    ]]></ad:Script>
  </resolver:AttributeDefinition>

I have used memberSubjectId and attributeAssignType variables in the scripting. These variables getting from the data connectors. The following variables are available in the data connectors for adding or deleting the member attribute in the change log entry. They are

ue,contextId=56dd5e5a2be84cfc8683a18f38829407] returning {id=id, attributeAssignId=attributeAssignId, attributeDefNameId=attributeDefNameId, attributeDefNameName=attributeDefNameName, value=value, valueType=valueType, actionName=actionName, changeLogCategory=changeLogCategory, sequenceNumber=sequenceNumber, createdOn=createdOn, etc:attribute:affiliations=etc:attribute:affiliations, attributeAssignType=attributeAssignType, memberSubjectId=memberSubjectId}

I have highlighted the variable names in the bold font.

6. Testing the psp-provisioning Add ldap attribute Value

Go to the apiBinary-2.1.5/bin directory and execute the gsh.sh file.

6.1 Restart the Grouper Session

grouperSession = GrouperSession.startRootSession();

6.2 Find the Member Object

subject = findSubject("test_member_uid9");
member = MemberFinder.findBySubject(grouperSession, subject);

6.3 Add the attribute affiliations value to the member object

 member.getAttributeValueDelegate().addValue("etc:attribute:affiliations","Student")

6.4 Executing the PSP Change Log

loaderRunOneJob("CHANGE_LOG_changeLogTempToChangeLog")

loaderRunOneJob("CHANGE_LOG_consumer_psp")

After executing the above step, the ldap attribute affiliations value is added to the person object uid=test_member_uid9,ou=people,dc=example,dc=edu

7. Testing the psp-provisioning Delete ldap attribute Value

Go to the apiBinary-2.1.5/bin directory and execute the gsh.sh file.

7.1 Restart the Grouper Session

grouperSession = GrouperSession.startRootSession();

7.2 Find the Member Object

subject = findSubject("test_member_uid9");
member = MemberFinder.findBySubject(grouperSession, subject);

7.3 Delete the attribute affiliations value to the member object

 member.getAttributeValueDelegate().deleteValue("etc:attribute:affiliations","Student")

7.4 Executing the PSP Change Log

loaderRunOneJob("CHANGE_LOG_changeLogTempToChangeLog")

loaderRunOneJob("CHANGE_LOG_consumer_psp")

After executing the above step, the ldap attribute affiliations value is deleted from the person object uid=test_member_uid9,ou=people,dc=example,dc=edu

Saturday, May 10, 2014

Adding the eduMember schema to Openldap

Importing the eduMember Ldap Schema to Open Ldap


1. Create the eduMember.ldif file


dn: cn={12}eduMember,cn=schema,cn=config
objectClass: olcSchemaConfig
cn: {12}eduMember
olcAttributeTypes: {0}( 1.3.6.1.4.1.5923.1.5.1.1 NAME 'isMemberOf' DESC 'Identifiers for groups to which containing entity belongs' EQUALITY caseExactMatch SYNTAX 1.3.6.1.4.1.1466.115.121.1.15 )
olcAttributeTypes: {1}( 1.3.6.1.4.1.5923.1.5.1.2 NAME 'hasMember' DESC 'Identifiers for entities that are members of the group' EQUALITY caseExactMatch SYNTAX 1.3.6.1.4.1.1466.115.121.1.15 )
olcObjectClasses: {0}( 1.3.6.1.4.1.5923.1.5.2 NAME 'eduMember' DESC 'eduMember for Groups' AUXILIARY MAY ( isMemberOf $ hasMember ) )


2. Import the eduMember.ldif to the openldap


ldapadd -x -h localhost -p 389 -D cn=config -W -f eduMember.ldif


Enabling the memberof attribute in openldap


Enabling the memberof attribute in openldap as follows

1. Adding the MemberOf Module


ldapadd -x -D cn=config -h localhost -p 389 -W
Enter LDAP Password:

dn: cn=module,cn=config
objectClass: olcModuleList
cn: module
olcModulePath: /usr/lib64/openldap/
olcModuleLoad: memberof


adding new entry "cn=module,cn=config"


After adding the above command cn=module{0}.ldif file created in the /etc/openldap/slapd.d/cn\=config directory.

2. Enabling the OverPlay

dn: olcOverlay=memberof,olcDatabase={2}bdb,cn=config
objectClass: olcMemberOf
objectClass: olcOverlayConfig
objectClass: olcConfig
objectClass: top
olcOverlay: memberof
olcMemberOfDangling: ignore
olcMemberOfRefInt: TRUE
olcMemberOfGroupOC: groupOfNames
olcMemberOfMemberAD: member

adding new entry "olcOverlay=memberof,olcDatabase={2}bdb,cn=config"

3. Testing the Member Of Attribute added to the user

   3.1 Creating the Ldap User

ldapadd -x -D cn=config -h localhost -p 389 -W
Enter LDAP Password:

dn: uid=test_member_uid,ou=People,dc=example,dc=edu
objectclass: top
objectclass: person
objectclass: organizationalperson
objectclass: inetorgperson
cn: test_member_uid
sn: test_member_uid
uid: test_member_uid
userPassword: test123

adding new entry "uid=test_member_uid,ou=People,dc=example,dc=edu"

3.2 Adding the New Group

dn: cn=test_memberof_grp,ou=Groups,dc=example,dc=edu
objectclass: groupofnames
objectclass: top
cn: test_memberof_grp
member: uid=test_member_uid,ou=People,dc=example,dc=edu

adding new entry "cn=test_memberof_grp,ou=Groups,dc=example,dc=edu"

3.3 Searching the Ldap User based on uid attribute

ldapsearch -x -D cn=Manager,dc=example,dc=edu -W -h localhost -p 389 -b ou=people,dc=example,dc=edu uid=test_member_uid dn memberof


Enter LDAP Password:

Ldap Search Result

# extended LDIF
#
# LDAPv3
# base <ou=people,dc=example,dc=edu> with scope subtree
# filter: uid=test_member_uid
# requesting: dn memberof
#

# test_member_uid, People, example.edu
dn: uid=test_member_uid,ou=People,dc=example,dc=edu
memberOf: cn=test_memberof_grp,ou=Groups,dc=example,dc=edu

# search result
search: 2
result: 0 Success


Installing the Open ldap centos 6.5

Installing the Open Ldap in Cent Os as follows


1. Installation Of open Ldap

Login as a root and execute the following commands to install the openldap.

yum install openldap openldap-clients openldap-servers

2. Generating the Open Ldap Root Password

Login as a root and execute the following command to generate the password

slappasswd
New password: <New Password>
Re-enter new password: <Confirm Password>
{SSHA}kkPYFxxxxxxxxxxxxxxxxxxxxxxxxxxx

3. Modifying the  olcDatabase={0}config.ldif file

Go to the /etc/openldap/slapd.d/cn=config directory and edit the  olcDatabase={0}config.ldif file and add the generated password after oldRootDN: cn=config

olcRootPW: {SSHA}kkPYFxxxxxxxxxxxxxxxxxxxxxxxxxxx


4. Modifying the  olcDatabase={2}bdb.ldif file


Go to the /etc/openldap/slapd.d/cn=config and edit the  olcDatabase={2}bdb.ldif file and modify the following properties and also add the generated password after oldRootDN: 

4.1 Modify the Root Suffix

Modify the olcSuffix value. In my example I modified from olcSuffix: dc=My-domain,dc=com to olcSuffix: dc=example,dc=edu

4.2 Modify the Root DN

Modify the olcRootDN value. In my example I modified from olcRootDN: CN=Manager,dc=My-domain,dc=com to olcRootDN: CN=Manager,dc=example,dc=edu

4.3 Add the Root DN Password

olcRootPW: {SSHA}kkPYFxxxxxxxxxxxxxxxxxxxxxxxxxxx


5. Modify the  olcDatabase\=\{1\}monitor.ldif

edit the  olcDatabase\=\{1\}monitor.ldif file and modify the olcAccess value from cn=manager,dc=my-domain,dc=com to cn=manager,dc=example,dc=com

6 Start the Open Ldap Server


service slapd start

7. Add the Root Suffix dc=example,dc=edu


ldapadd -x -h localhost -p 389 -D "CN=Manager,dc=example,dc=edu" -W
Enter LDAP Password:
dn: dc=example,dc=edu
objectClass: dcObject
objectclass: organization
o: Example
dc: example

adding new entry "dc=example,dc=edu"

8. Add the CN=Manager Organizational Role


ldapadd -x -h localhost -p 389 -D "CN=Manager,dc=example,dc=edu" -W
Enter LDAP Password:

dn: CN=Manager,dc=example,dc=edu
objectClass: organizationalRole
cn: Manager

adding new entry "CN=Manager,dc=example,dc=edu"

9. Add the Ou=People and Ou=Groups Organizational Unit to store the Users and Groups

ldapadd -x -h localhost -p 389 -D "CN=Manager,dc=example,dc=edu" -W
Enter LDAP Password:

dn: ou=People,dc=example,dc=edu
objectclass: organizationalUnit
ou: People

adding new entry "ou=People,dc=example,dc=edu"

dn: ou=Groups,dc=example,dc=edu
objectclass: organizationalunit
ou: Groups

adding new entry "ou=Groups,dc=example,dc=edu"


Friday, May 9, 2014

ldap_add insufficient access (50) openldap

Error:

ldap_add insufficient access (50) openldap

Cause:

The  ldap_add insufficient access (50) openldap exception is thrown while adding or modifying the cn=Config object in the Open Ldap because the admin user CN=Manager,dc=example,dc=edu don't  have enough privileges to update the schema.

Solution:

1. Finding the olcRootDN in olcDatabase={0}config.ldif

You need  to update the schema  using the cn=Config Object. You can find the olcRootDN as follows

Go to the /etc/openldap/slapd.d/cn=config directory and edit the olcDatabase={0}config.ldif file. Find the olcRootDN in this file. In my config files olcRootDN is olcRootDN: cn=config

2. Updating the olcRootDN password 

   2.1 Generating the New Password
 
  execute the slappasswd command and it will generate the new password as follows.


 slappasswd
New password:
Re-enter new password:
{SSHA}Hfpsjkt/Am2LDOndfBmPyjWyXaBk8K+


   2.2 Updating the olcRootDN password

Go to the /etc/openldap/slapd.d/cn=config and edit the olcDatabase={0}config.ldif file and add the generated password after olcRootDN

olcRootPW: {SSHA}Hfpsjkt/Am2LDOndfBmPyjWyXaBk8K+

Save the file and restart the Ldap Server


3. Updating the Config Object

 3.1  Adding the module object (addmodule.ldif)

dn: cn=module,cn=config
objectClass: olcModuleList
cn: module
olcModulePath: /usr/lib64/openldap
olcModuleLoad: memberof

 3.2 Executing the LDAP command

ldapadd-x -h <hostname> -p 389 -D CN=config -W -f addmodule.ldif


The ldap_add insufficient access (50) openldap will be resolved after executing the above steps.


Saturday, May 3, 2014

Testing the OIM 11G R2 PS2 Identity Manager Installation

Testing the OIM 11G R2 PS2 Identity Manager Installation


Accessing the Oracle Identity Manager Admin UI

http://<OIM Managed Host>: <Port>/sysadmin.

For example http://liyaqat.localdomain.com:14000/sysadmin/

After accessing the URL and it will display the following screen.


Enter the user name is xelsysadm and password is xelsysadm password. Click Sign In button and It will display the following screen.


Accessing the Oracle Identity Manager Self Service UI

http://<OIM Managed Host>: <Port>/identity.

For example
http://liyaqat.localdomain.com:14000/identity/

After accessing the URL and it will display the following screen.


Enter the user name is xelsysadm and password is xelsysadm password. Click Sign In button and It will display the following screen.


Accessing the SOA-INFRA application

http://<SOA Managed Host>: <Port>/soa-infra.

For example
http://liyaqat.localdomain.com:8001/soa-infra

After accessing the URL and it will display the following screen.


Enter the user name is xelsysadm and password is xelsysadm password. Click Sign In button and It will display the following screen.


For your reference Documents

http://docs.oracle.com/cd/E40329_01/index.htm


Starting the OIM 11G R2 PS2 Managed Server

Starting the OIM 11G R2 PS2 Managed Server


You can start the oim managed server two ways. They are

1. Command Line

Go to the Domain_HOME/bin directory and execute the startManagedWebLogic.sh file as follows.

./startManagedWebLogic.sh oim_server1 t3://adminhost:adminport <weblogic user name> <weblogic password>

For example ./startManagedWebLogic.sh oim_server1 t3://liyaqat.localdomain.com:7001  weblogic  <weblogic password>


2. Web Logic Admin Console using Node Manager.


   Access the Web Logic Admin Console

http://<weblogic Admin Host Name>:port/console. For example http://liyaqat.localdomain.com:7001/console.

Enter WebLogic User Name and Password. Click Login Button. 

Add the oim_server1 in the Machines


Click Environment --> Machines --> Local Machines -->Servers -->Add --> Select Server --> oim_server1 --> Finish

It will add the oim_server1 into the Local Machines.

Start the OIM Server

Click Environment --> Servers --> Control --> Select oim_server1 check box --> Start. 

it will start the OIM Managed Server.


Configuring the Oracle Identity Manager 11G R2 PS2

Configuring the Oracle Identity Manager 11G R2 PS2

Go to the Oracle_IDM1/bin directory 


Execute the config.sh file and it will open the following screen.


Click Next.


Leave the default selected check box. That is OIM Server. Click Next.


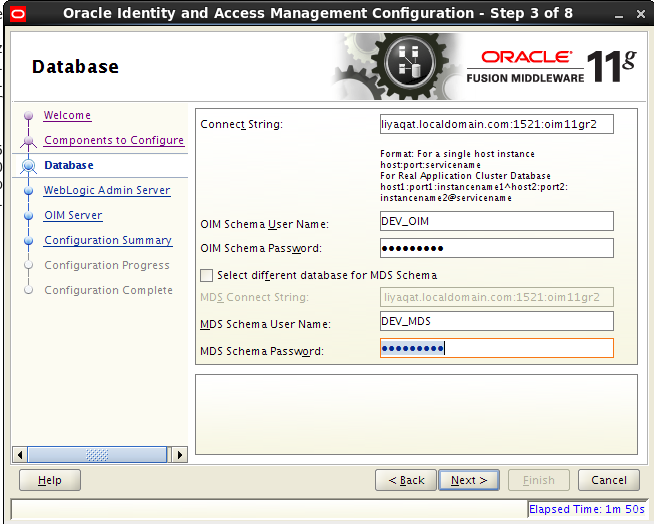
Enter the Connection String, OIM Schema User Name, OIM Schema Password, MDS Schema User Name, MDS Schema Password. Click Next


Enter the weblogic Admin Server URL,User Name, and Password. In my example Web Logic Admin Server URL is t3://liyaqat.localdomain.com:7001, User Name weblogic and Password is weblogic password.

Click Next.


Enter the OIM Admin (xelsysadm) Password,Confirm Password, OIM HTTP URL,KeyStore Password, Configm KeyStore Password. Click Next


Click Configure button and it will configure the OIM Server. 


Click Next.


The OIM Server configuration is completed. Click the Finish button to close the window.


Start the Web Logic Admin Server and SOA managed Server

Start the Web Logic Admin Server and SOA managed Server

Start the Web Logic Admin Server.

Go to the the OIM_DOMAIN/bin directory and execute the startWebLogic.sh.

It will start the Web Logic Admin Server.

Accessing the Web Logic Admin Console

http://hostname:port/console.

For example http://liyaqat.localdomain.com:7001/console.

After Accessing the Console and it will display the following screen.


Enter weblogic username and password. Click Login button and it will display the following screen.


Click Environment -->  Servers  and It will display the list of available Admin servers and Managed Servers.


Starting the SOA Managed Server

You can start the managed server two ways. They are

1. Command Line

Go to the OIM_DOMAIN/bin directory and execute the startManagedWebLogic.sh file. For example

./startManagedWebLogic.sh soa_server1 t3://liyaqat.localdomain.com:7001

The liyaqat.localdomain.com is the web logic Admin server host name and port 7001 is web logic admin server port.


2. Using the Node Manager Web Logic Admin Console

Click Contol menu and it will display the following screen.


Select soa_server1 and Click Start button and it will display the following screen.


Configuring the Oracle Identity Manager 11G R2 PS2


Configuring the Node Manager

Configuring the Node Manager

The node manager is being used to start the managed servers using weblogic admin console.  The configuration of the node manager as follows.

Create the nodemanager.properties file


Go to the MH_HOME/oracle_common/common/bin directory and execute the setNMPProps.sh. It will create the nodemanager.prperties file.

Start the Node Manager


Go to the MH_HOME/wlserver_10.3/server/bin/ directory and execute the startNodeManager.sh file.  It will listen 5556 port.


Configure the Database Security Store OIM 11G R2 PS2

Configure the Database Security Store OIM 11G R2 PS2


Go to the MH_HOME/oracle_common/common/bin directory and execute the wlst.sh file.

Parameters:

MH_HOME/Oracle_IDM1/common/tools/configureSecurityStore.py
-d <OIM Domain Directory>
-c Config Mode
-p Password
-m mode

The command shown below.


After executing the above command it will create the security store. The screen shot is given below.


Validating the Security Store


Validating the security store properly created or not.


Upgrade the OPSS schema using Patch Set

Upgrade the OPSS schema using Patch Set 


The following tasks needs to be performed to upgrade the opss schema using patch set. They are

Go to the oracle_common/bin directory.

Execute the ./psa file and it will open the following screen.


Click Next.


Select Oracle Identity Manager Check Box and it will display the following screen.


Click Next.


Enter the Connection String, DBA User Name, and DBA password. The example values are shown above screen shot. Click Next.


Leave the Schema User Name is default value and enter Schema Password. Click Next.


If the password is same, leave the default value for Schema User Name and Password. If the password is different for each user, you need to enter schema password for each user. Click Next.


If the password is same, leave the default value for Schema User Name and Password. If the password is different for each user, you need to enter schema password for each user. Click Next.


If the password is same, leave the default value for Schema User Name and Password. If the password is different for each user, you need to enter schema password for each user. Click Next.


If the password is same, leave the default value for Schema User Name and Password. If the password is different for each user, you need to enter schema password for each user. Click Next.

After clicking the Next button, it will upgrade the Oracle Platform Security Services.


Click Next.


Click Upgrade button and It will upgrade the OPSS schema.


Click Next.


Click Close button and it will close the window.

Verify the Schema Upgraded with version numbers in Oracle Data Base.


Login as a sysadmin and Select the table schema_version_registry. All status should be valid and OPSS user Upgraded flag should be Y. The verified query is given below in the screen shot. 


Creating the Web Logic Admin domain OIM 11G R2 PS2

Creating the Web Logic Admin Domain OIM 11G R2 PS2

The following steps needs to be performed to create the weblogic admin domain. They are


Go to the Oracle_IDM1/common/bin directory and execute config.sh file

After executing the config.sh file and it will display the following screen.


Select the Create new WebLogic domain option and Click Next button.


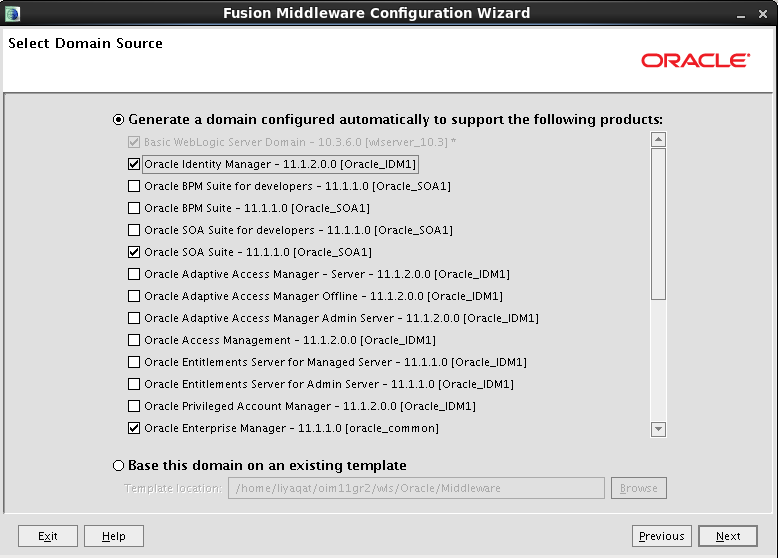
Select the Oracle Identity Manager check box and it will display the following screen


Click Next.


Enter the Domain name. In my example domain name is oimdomain. Click Next.


Enter the User password and Confirm Password. Click Next.


Leave the default options, Click Next.


Select all check boxes and it will enable following fields. They are Vendor, DBMS/Service, Driver, Host Name, Schema Owner, Port, Schema Password.  Please Select Vendor is Oracle, Enter DBMS/Service. My example DBMS/Service is oim11gr2. Select Driver is Oracle Driver Thin. Enter Host Name, port, and Schema Password. The sample screen shot given below.


Click Next button and it will test the database connectivity. The database connectivity screen shot is given below.


Click Next.


Leave the default values and click Next button.


Click Create button and it will create the web logic domain.


Upgrade the OPSS schema using Patch Set