The following tasks needs to be performed to create the OIM metadata for provisioning and Reconciliation. They are
The following components are required to build the user provisioning. They are
1. IT Resource Type Definition
2. Connector Lookup Configuration
3. Pre-Populate Adapters
4. Process Form Definition
5. Process Task Adapters
6. Resource Object
7. Process Definition
1. It Resource Type Definition
This component is required to establish the communication from Oracle Identity Manager to Target Resource. In our example target resource is Data Base Identity Connector. Creating the IT Resource Type Definition as follows.
Login to the design console --> Resource Management --> IT Resource Type Deinition. Enter the Server Type and Select Insert Multiple Check box and Click Save. It will create the IT Resource Type Definition as Database ICF Connector.
It Resource Type Parameters:
The IT Resource Type Parameters are available in the DataBaseIdentityConfig class with @ConfigurationProperty annotation. Those properties should be added in the IT Resource Parameter Section and also you need to add additional parameter
Configuration Lookup for configuring the Connector Info like Connector Class, Connector Bundle, Connector Provisioning Attribute Mapping, etc.
The IT Resource Type Parameters are
1. driver
2. url
3 userName
4. password
5. environment
6. Configuration Lookup.
The example screen shot is given below.
2. Connector Lookup Configuration
This component is required to maintain the connector configuration for user provisioning and reconciliation. The following lookup configuration needs to be configured:
2.1 Lookup.dbicf.Configuration
This Component is required to configure the connector bundle information and also User Provisioning and Reconciliation Lookup info. The lookup parameters as follows:
1. Bundle Version
2. Bundle Name
3. Connector Name
4. User Configuration Lookup.
The Bundle Version and Bundle Name is available in the Data Base Connector ICF JAR in the META-INF/MANIFEST.MF file. The Connector Name is Data Base Identity Connector class with full qualified name. In our example edu.sfsu.identity.dbconnector.DatabaseIdentityConnector. The bundle name mapping should be as follows:
Bundle Version = ConnectorBundle-Version
Bundle Name= ConnectorBundle-Name
Connector Name = Connector Class Name with package
User Configuration Lookup=Lookup.dbcf.UM.Configuration
The sample values are given below in the screen shot.
2.2 Lookup.dbcf.UM.Configuration
This component is required for configuring the Provisioning and Reconciliation configuration lookup details. The configuration lookup parameters as follows:
1. User Validation For Prov = false
2. Provisioning Attribute Map = Lookup.dbcf.UM.ProvAttrMap
3. User Transformation For Recon = false
4. User Validation For Recon = false
5. Recon Attribute Map = Lookup.dbcf.UM.ReconAttrMap
The parameter 2. Provisioning Attribute Map contains the Process Form field label and target resource schema mapping.
The configuration details are given below as a screen shot.
2.3. Lookup.dbcf.UM.ProvAttrMap
This component is required for provisioning attribute mapping from Process Form Field Label to Target Resource Schema Mapping. The mapping details as follows:
1. Unique ID = __UID__
2. User Login = userLogin
3. User Password = password
4. First Name= firstName
5. Last Name = lastName
6. Middle Name= middleName
The configuration details are given below as a screen shot.

3. Pre-Populate Adapter
This component is required to transfer the values from Oracle Identity Manager User data to Process Form while after initiating the user provisioning. The pre-populate creation process as follows:
3.1. Create Pre-populate Adapter
3.2. Create Adapter Variable
3.3. Create Adapter Task
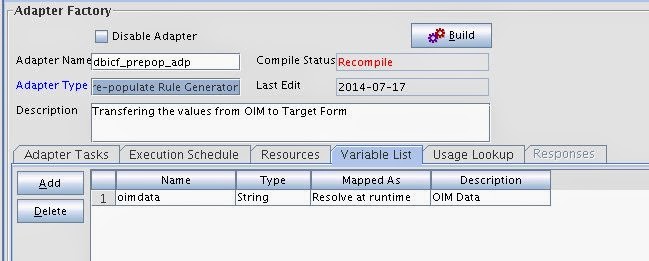
3.1. Create Pre-populate Adapter
Click Adapter Factory --> and enter the following values into the form
Adapter Name: dbicf_prepop_adp
Adapter Type: Pre-populate Rule Generator
Description: Enter your description
Click Save Icon and It will create the Pre-Populate Adapter
3.2. Create Adapter Variable
Click Variable List --> Add and it will display the following screen.
Enter the following details into the variable screen and click Save Icon.
Variable Name: oimdata
Type : String
Mapp To : Resolve at runtime
Description: Enter Description
The configuration of the Adapter Variable as follows:
3.3. Create Adapter Task
Click Add --> Logic Task --> SET VARIABLE --> and It will display the following screen.
Select the variable Name is Adapter return value, operand Type is Variable and Operand Qualifier is oimdata. The sample is given below.
Click Save Icon and it will Display the following screen.
Click Build Button and It will compile the adapter and ready to use in process form.
4. Process Form Definition
This component is required to capture the data from Oracle Identity Manager and transfer to process definition to store the values in target resource. The following sub component are required to create the process form definition.
4.1 Creating the Process Form
4.2 Additional Columns
4.3 Properties
4.4 Pre-Populate
4.5 Building Form
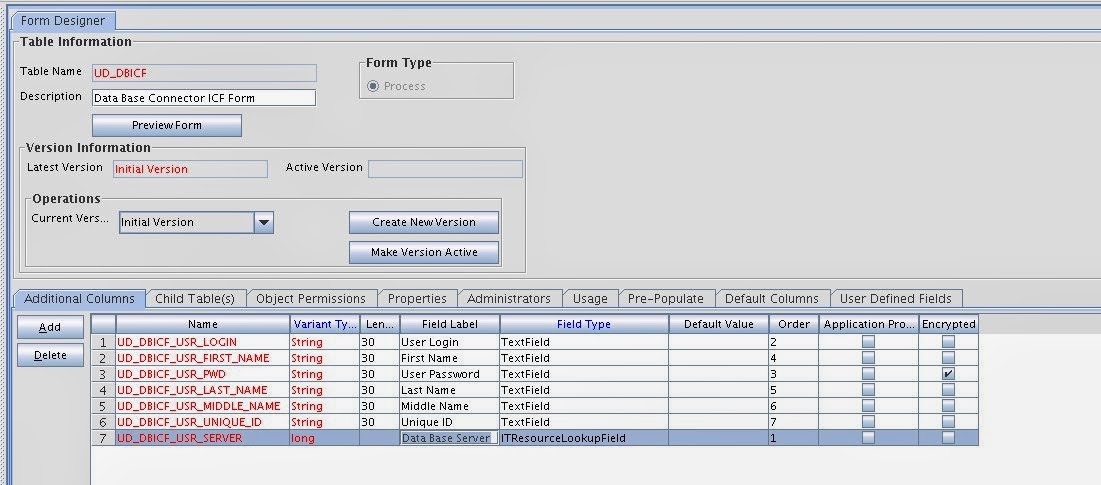
4.1 Creating the Process Form
Click Form Designer --> Enter Table Name and Description and Click Save Button. It will create the Process Form. The process form configuration is given below as a screen shot.
4.2 Additional Columns
Add the following additional columns in the Additional Column Section to capture the data. They are
1. Unique ID
2. User Login
3. User Password
4. First Name
5. Last Name
6. Middle Name
7.Data Base Server
The configuration details are given below:
4.3 Properties
Click Properties tab and configure the following properties for validation.
1. User Login
Required = true
2. User Password
Required = true
3. Last Name
Required = true
4.Data Base Server
Required = true
Type = Data Base ICF Connector
The configuration details are given below:
4.4 Pre-Populate
This component is required for mapping from OIM User to Process Form Field. The following field are mapping:
1. User Login = User Login
2. User Password = Password
3. First Name = First Name
4. Last Name= Last Name
5. Middle Name = Middle Initial
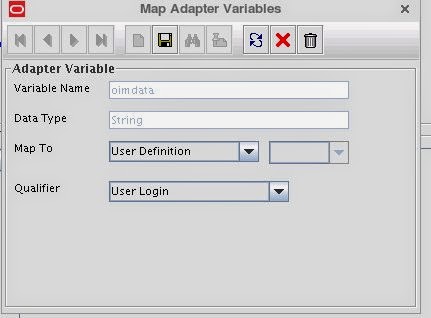
The User Login configuration as shown below a screen shot.
Select the Field Name is User Login, Rule is Default, Adapter is dbicf_prepop_adp and Clcik Save. Click Map Button and It will display the following screen.
Select Map To is User Definition and Qualifier is User Login. Click Save Icon.
Repeat the steps for remaining fields. After completion of the configuration look like this:
4.5 Building Form
Click Make version Active button and it will display the following screen.
Click OK button and it will activate the form is active mode and and we can use in the resource object.
5. Process Task Adapters
This is required to process the data from OIM to target resource and persists the data into the database. The following components are required for database connector. They are
5.1. Create User
5.2. Update User
5.3. Delete User
5.4. Enable User
5.5. Disable User
5.1. Create User
5.1.1.Create Adapter
Click Adapter Factory --> Enter the Adapter Name. Adapter Type and Description. Click Save Icon and It will display the following screen.
5.1.2 Create Responses
The following responses needs to be created. They are
Code Name - Status
1. SUCCESS - C (Completed)
2. ERROR - R (Rejected Due to failure)
The configuration as follows:
5.1.3.Create Variable
Click Variable List tab and Create the following variables in the variable list. They are
Name - Type - Mapped As - Description
1. objectType - String - Resolve at runtime - objecttype
2. processInstanceKey - Long - Resolve at runtime - processinstancekey
3. itResourceColumnName -String - Resolve at runtime - itresourcecolumnnmae
Resolve at runtime means we will map the values later at the process definition create task mapping.
The configuration as follows:
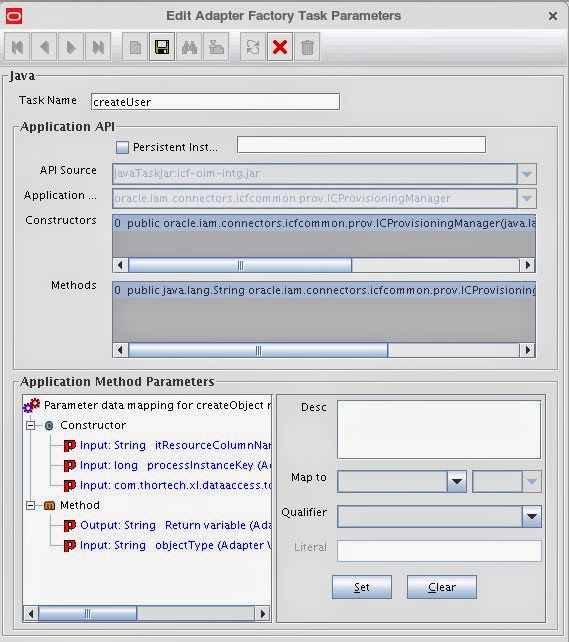
5.1.4.Create Adapter Task
Click Adapter Task tab --> Add --> Functional Task (Java) --> Select New Object Instance --> Continue --> Enter task Name and Select API Source is ICFIntglar:icf-oim-intg.jar and Select Application is ICProvisioningManager class and Select method createObject. Click Save Icon and It will display the following screen.
Click Constructor and Method it will display the following screen.
Constructor Mapping
Input: String - Map to
Adapter Variable - Name is
itResourceColumnName
inpiut: long - Map to
Adapter Variable - Name is
processInstanceKey
input: com.thortech.xl.dataaccess.tcDataProvider - Map to
Adapter References - Name is Database reference
Method Mapping
Output: String - Map to
Adapter Variable - Name is
Return Variable
Input: String - Map to
Adapter Variable - Name is
objectType
After mapping is done, the configuration is given below:
Click Save Icon and click close button and it will display the following screen.
5.1.5 Compile the Adapter
Click Build button and It will compile the adapter and it will display the following screen.
After compiling the adapter , the Compile Status os
OK. If your seeing any error while compiling the adapter, please fix the errors and recompile.
5.2. Update User
5.2.1.Create Adapter
Follow the step 5.1.1 to create the adapter.
5.2.2 Create Responses
Follow the steps 5.1.2 to create the responses.
5.2.3.Create Variable
Follow the steps 5.1.3 to create the variables. Add the following additional variable:
attrFieldName -String - Resolve at runtime - Attribute Field Label.
5.1.4.Create Adapter Task
Follow the steps 5.1.4 to create the Adapter task. Choose Methods is updateAttributeValue(String).
Constructor Mapping
Input: String - Map to
Adapter Variable - Name is
itResourceColumnName
inpiut: long - Map to
Adapter Variable - Name is
processInstanceKey
input: com.thortech.xl.dataaccess.tcDataProvider - Map to
Adapter References - Name is Database reference
Method Mapping
Output: String - Map to
Adapter Variable - Name is
Return Variable
Input: String - Map to
Adapter Variable - Name is
objectType
Input: String - Map to Adapter Variable - Name is attrFieldName
5.2.5 Compile the Adapter
Follow the steps 5.1.5 to compile the dapter
5.3 Delete User
5.3.1.Create Adapter
Follow the step 5.1.1 to create the adapter.
5.3.2 Create Responses
Follow the steps 5.1.2 to create the responses.
5.3.3.Create Variable
Follow the steps 5.1.3 to create the variables.
5.3.4.Create Adapter Task
Follow the steps 5.1.4 to create the Adapter task. Choose Methods is deleteUser(String objectType)
Constructor Mapping
Input: String - Map to
Adapter Variable - Name is
itResourceColumnName
inpiut: long - Map to
Adapter Variable - Name is
processInstanceKey
input: com.thortech.xl.dataaccess.tcDataProvider - Map to
Adapter References - Name is Database reference
Method Mapping
Output: String - Map to
Adapter Variable - Name is
Return Variable
Input: String - Map to
Adapter Variable - Name is
objectType
5.3.5 Compile the Adapter
Follow the steps 5.1.5 to compile the dapter
5.4 Enable User
5.4.1.Create Adapter
Follow the step 5.1.1 to create the adapter.
5.4.2 Create Responses
Follow the steps 5.1.2 to create the responses.
5.4.3.Create Variable
Follow the steps 5.1.3 to create the variables.
5.4.4.Create Adapter Task
Follow the steps 5.1.4 to create the Adapter task. Choose Methods is enableObject(String objectType)
Constructor Mapping
Input: String - Map to
Adapter Variable - Name is
itResourceColumnName
inpiut: long - Map to
Adapter Variable - Name is
processInstanceKey
input: com.thortech.xl.dataaccess.tcDataProvider - Map to
Adapter References - Name is Database reference
Method Mapping
Output: String - Map to
Adapter Variable - Name is
Return Variable
Input: String - Map to
Adapter Variable - Name is
objectType
5.4.5 Compile the Adapter
Follow the steps 5.1.5 to compile the adapter
5.4 Disable User
5.5.1.Create Adapter
Follow the step 5.1.1 to create the adapter.
5.5.2 Create Responses
Follow the steps 5.1.2 to create the responses.
5.5.3.Create Variable
Follow the steps 5.1.3 to create the variables.
5.5.4.Create Adapter Task
Follow the steps 5.1.4 to create the Adapter task. Choose Methods is disableUser(String objectType)
Constructor Mapping
Input: String - Map to
Adapter Variable - Name is
itResourceColumnName
inpiut: long - Map to
Adapter Variable - Name is
processInstanceKey
input: com.thortech.xl.dataaccess.tcDataProvider - Map to
Adapter References - Name is Database reference
Method Mapping
Output: String - Map to
Adapter Variable - Name is
Return Variable
Input: String - Map to
Adapter Variable - Name is
objectType
5.5.5 Compile the Adapter
Follow the steps 5.1.5 to compile the adapter
6. Resource Object
Creating Resource Object
Click Resource Object --> Enter Object Definition Name, Select Type is
Application, Select Allow multiple (Multiple Instances can be created), Allow All (Every one can be requested),Self Requested Allow (Request the resource using the self Service Option), and Off-line Provisioning Check boxes. Click Save and It will create the Resource Object.
7. Process Definition
Click Process Management --> Process Definition --> Enter Name, Type,Object Name, Table Name, Select Default Process, Auto Pre-populate, and Auto Save Form Check box. Click Save Button and it will display the following screen.
Tasks
The following tasks needs to be created for provisioning operations in the connector. They are
7.1 Create User
Create task is being used to provision the user into the target system.
7.1.1 Create User Task:
Click Add button in the Tasks Section and it will open the following screen.
Enter the Task Name is Create User, Task Description is Creating the User in target System, Select Required for Completion, Allow Cancellation while Pending, Allow multiple Instances, Enter Retry Period in minutes, and Retry Count. Click Save button.The configuration details are given below.
Task Integration
Click Integration tab and it will display the following screen.
Click Add button and It will display the following screen.
Select Adapter option and it will display the following screen.
The create user adapter name is dbicf_database_createuser. While you selecting this adapter in the process definition is adpDBICF_DATABASE_CREATEUSER.
Select Create User adapter is adpDBICF_DATABASE_CREATEUSER and it will
Click OK Button and It will display the following screen
Click Yes button and it will display the following screen.
Integration Adapter Mapping:
Select
Adapter return value and click Map button and It will display the following screen.
Select the Map To is Response Code and Click Save Button and Click Close button.
Select
objectType and click Map button and It will display the following screen.
Select Map to is Literal,Qualifier is String, and Literal Value is User. Click Save and Close button.
Select processInstanceKey --> click Map button --> Select Map to Process Data and Qualifier is Process Instance. Click Save and Close button.
Select itResourceColumnName --> click Map button --> Select Map to Literal, Qualifier is String, and Literal value is UD_DBICF_USR_SERVER. Click Save and Close button. After configuring all the variables, the configuration is shown below.
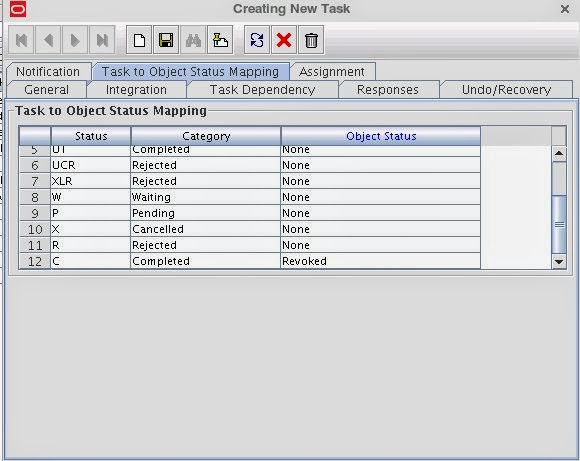
Tasks Object Status Mapping
Click Object Status Mapping Tab --> Select Status C and Object Status is Provisioned and Click Save. The configuration as follows:
Click Save and Close Button.
Tasks Enable User
General Tab
Click Add button and Enter the following details in the general Section.
Task Name : Enable User
Description :
Enabling the user in target resource
Select Task Properties like Conditional, Required Completion,Allow Cancellation while pending, Allow multiple instances, Enter Retry Period in minutes is 30 and Retry Count is 5.
Select Task Effect is
Enable Process or Access to Application
The Configuration details are given below
Integration Tab
Click Integration Tab --> Add --> Select Adapter option --> Select adpDBICF_DATABASE_ENABLEUSER --> Click Save --> Click OK button --> Click Yes Button.
Mapping the Adapter Variable
Select Adapter return value --> click Map button --> Select Map to Response Code. Click Save and Close button.
Select objectType --> click Map button --> Select Map to Literal,Select Qualifier String, and
Literal Value is User. Click Save and Close button.
Select itResourceColumnName --> click Map button --> Select Map to Literal,Select Qualifier String, and Literal Value is UD_DBICF_USR_SERVER. Click Save and Close button.
Select processInstanceKey --> click Map button --> Select Map to Process Data and Qualifier is Process Instance. Click Save and Close button.
After Completing the Configuration as follows:
Task Object Status Mapping
Click Object Status Mapping Tab --> Select Status C and Object Status is Enabled and Click Save. The configuration as follows:
Click Save and Close button. It will create the Enable User Task.
Tasks Disable User:
General Tab
Click Add button and Enter the following details in the general Section.
Task Name : Disable User
Description :
Disabling the user in target resource
Select Task Properties like Conditional, Required Completion,Allow Cancellation while pending, Allow multiple instances, Enter Retry Period in minutes is 30 and Retry Count is 5.
Select Task Effect is
Disable Process or Access to Application
The Configuration details are given below
Integration Tab
Click Integration Tab --> Add --> Select Adapter option --> Select adpDBICF_DATABASE_DISABLEUSER --> Click Save --> Click OK button --> Click Yes Button.
Mapping the Adapter Variable
Select Adapter return value --> click Map button --> Select Map to Response Code. Click Save and Close button.
Select objectType --> click Map button --> Select Map to Literal,Select Qualifier String, and
Literal Value is User. Click Save and Close button.
Select itResourceColumnName --> click Map button --> Select Map to Literal,Select Qualifier String, and Literal Value is UD_DBICF_USR_SERVER. Click Save and Close button.
Select processInstanceKey --> click Map button --> Select Map to Process Data and Qualifier is Process Instance. Click Save and Close button.
After Completing the Configuration as follows:
Task Object Status Mapping
Click Object Status Mapping Tab --> Select Status C and Object Status is Disabled and Click Save. The configuration as follows:
Click Save and Close button. It will create the Disable User Task.
Tasks Delete User:
General Tab
Click Add button and Enter the following details in the general Section.
Task Name : Delete User
Description :
Deleting the user in target resource
Select Task Properties like Conditional, Required Completion,Allow Cancellation while pending, Allow multiple instances, Enter Retry Period in minutes is 30 and Retry Count is 5.
Integration Tab
Click Integration Tab --> Add --> Select Adapter option --> Select adpDBICF_DATABASE_DISABLEUSER --> Click Save --> Click OK button --> Click Yes Button.
Mapping the Adapter Variable
Select Adapter return value --> click Map button --> Select Map to Response Code. Click Save and Close button.
Select objectType --> click Map button --> Select Map to Literal,Select Qualifier String, and
Literal Value is User. Click Save and Close button.
Select itResourceColumnName --> click Map button --> Select Map to Literal,Select Qualifier String, and Literal Value is UD_DBICF_USR_SERVER. Click Save and Close button.
Select processInstanceKey --> click Map button --> Select Map to Process Data and Qualifier is Process Instance. Click Save and Close button.
After Completing the Configuration as follows:
Task Object Status Mapping
Click Object Status Mapping Tab --> Select Status C and Object Status is Revoked and Click Save. The configuration as follows:
Tasks User Login Updated:
Tasks Disable User:
General Tab
Click Add button and Enter the following details in the general Section.
Task Name : User Login Updated
Description : Updating the user login target resource
Select Task Properties like Conditional, Required Completion,Allow Cancellation while pending, Allow multiple instances, Enter Retry Period in minutes is 30 and Retry Count is 5.
The Configuration details are given below
Integration Tab
Click Integration Tab --> Add --> Select Adapter option --> Select adpDBICF_DATABASE_DISABLEUSER --> Click Save --> Click OK button --> Click Yes Button.
Mapping the Adapter Variable
Select Adapter return value --> click Map button --> Select Map to Response Code. Click Save and Close button.
Select objectType --> click Map button --> Select Map to Literal,Select Qualifier String, and
Literal Value is User. Click Save and Close button.
Select attrFieldName --> click Map button --> Select Map to Literal,Select Qualifier String, and Literal Value is USer Login. Click Save and Close button.
Select itResourceColumnName --> click Map button --> Select Map to Literal,Select Qualifier String, and Literal Value is UD_DBICF_USR_SERVER. Click Save and Close button.
Select processInstanceKey --> click Map button --> Select Map to Process Data and Qualifier is Process Instance. Click Save and Close button.
After Completing the Configuration as follows:

Repeat tasks User Login Updated steps for the following tasks.
Tasks User Password Updated
Tasks First Name Updated
Tasks Last Name Updated
Tasks Middle Name Updated